Thursday, February 27, 2014

Look, in the sky! It's a UFO!

So I've been trying to roll through some of my UFO's.  Many of these have been sitting for almost a year now!

Some are projects I dropped because... Squirrel!

Some sat because I couldn't get excited about the hand stitching that needed to be done.  Others sat because I didn't like the way they were turning out and didn't know if it was worth the effort to continue.  Maybe because it's starting to look like spring around here I felt the need to poop or get off the pot on some of these.

The first was an easy fix.  A skirt from Lekala Sewing Patterns.

Skirt With Tail Sewing Pattern #5928
Frankly it was a little advanced for my skills a year ago.  A rather complex pattern w/minimal instructions and no seam allowances.  On top of that I used the wrong fabric and the wrong thread...

Amazingly enough I ended up with a skirt I rather liked - though it took me a year to put a button on it (don't ask me why).


The fabric is a green cotton... almost a soft burlap - hard to describe.  It didn't have the drape this skirt deserved but as I said I kind of enjoy the hard/soft contrast of it.  As for the pattern.  It's great!  Well drafted and fit me perfectly - which is important since with all those pieces I wouldn't have known where to even start to make adjustments.

And in case you didn't know - Lekala is a pattern company that custom drafts patterns based on your measurements.  And with skirts I have great luck with them.  I've only tried one top and had issues with the fit - but as I said, it was a year ago, these are not 'easy' patterns and my skills have come a long way.  Plus in the past year Lekala has added additional measurements to their order form so I'm willing to give it another go.

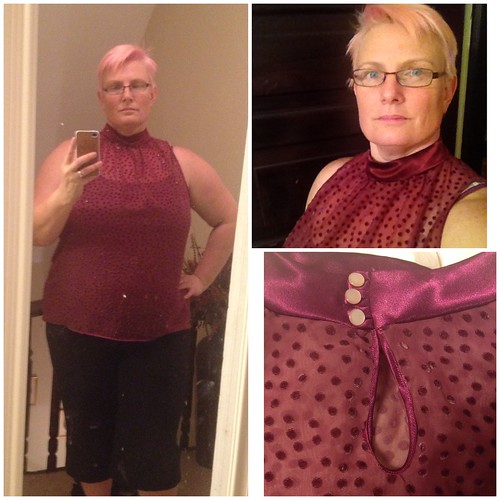
The next UFO was a top.  I started it last April/March

The goal was to make Mccall's (M6648)


 this beautiful floral shirting I found recently at fabric.com.


The problem was - hand sewing - TONS of it and a finished project I wasn't sure I liked.

The sleeves are HUGE and it leaves a LOT of ease --

As you can see the arm scythe reaches half way down my body.  All that fabric was making me feel like I was downing in this top.  But I finished it.. wore it for a while, took some photos, modeled it for my husband and... it's passable.


I would, however, like to point out the pattern matching on the front...


 I'm not sure I NEEDED to be that anal and it might have been better to break up the pattern now that I've made it up.. but I'm proud of how well it turned out.

And the last UFO.. well it's still a UFO - I'm just not sure I like it and I'm not excited about completing it.


what I don't like is how the front draping doesn't follow the same line as the kneckline... I may play with it and see if I can fix it, but until then I'm not putting on the sleeves...

Tuesday, February 25, 2014

Sew Bossy!!

Do you want to boss me around?

Want to tell me what to sew?

Well here's your chance.  As part of the Monthly stitch we've been asked to let someone else pick the next project and so I present you with three choices - all Vintage because 1) I need stuff to take with me to Viva and 2) Because I made a vintage sewing pledge.

#1


Butterick 9348 - a three piece playsuit - so very cute!

#2

Simplicty 1602 - a sheath dress with overskirt

PS:  This pattern has some of the scariest art I've ever seen - Those eyes - they won't stop staring at me!

#3
a simple dress with awesome scallop design - I would make view 1 with pockets because... pockets!


And so, I leave the rest up to you!

Monday, February 24, 2014

A tale of two bags


I've been following along with the bag city bags sew along for two months and I've been loving it.

So far I've made three bags (in two months) and have learned so much!  The added bonus is that I've gotten to use up a bunch of scraps and 'orphaned' fabric that I might otherwise not have used. 

The first bag I made I already blogged about - the fireside bowl bag that I made in with the purple/ladybug fabric. 

As soon as I finished that bag I knew I wanted to make another for my youngest. Since her favorite color is green I did a search of my fabric database to find the right stuff. What I found was a little different and unexpected... A dark green suiting made of wool with a silver metallic thread running through it. 

I had originally bought it (on clearance for $2.99 from fabric.com) to make a skirt but after getting it home didn't really like it for that. But for a bag it was perfect. I also had some green lining material for the inside of the bag that matched perfectly. All I needed was the contrast. For that I dropped by walmart and found a green on green floral cotton that was perfect for $2. 

All together I think it made up into a really cute bag!


I made a few minor changes from the original design suggestions. 

First, I made piping for the trim instead of just using strips of fabric. I just cut bias strips out of the lining and sewed it around some cord I picked up


I love the way this looks and want to try piping all the seams on a bag sometime

I also skipped using hardware for the handle (which I made out of the wool) and just sewed it directly to the bag. And I made the interior pockets out of the wool too to add some interest to the inside. 


The best part of all is that my kiddo loves it

Now this months 'official' bag was a little different. It was called the go go bag. The pattern was an envelope style with a flap, closed with a metal swivel and two zipper pockets. 

I decided to make it out of zebra print twill scraps from the trench coat I'm working on, trimmed with black slipper satin. 

As I was figuring out what was available in my zipper stash, I found a hot pink one and that gave me the idea to do all the top stitching in pink. I then closed the bag with a hot pink button because I didn't want to spend the money on the special heard ware. The end result...


 Well, I think it's marvelous!  

If you are part of the sew along you might note that my accent piece looks a little different then the instructions.  That was a 'happy mistake' of sorts. When I put on the large accent it moved some while I was top stitching and wasn't centered anymore . No one would have probably noticed but me, but it bugged me. As I debated ripping out all the stitching I started playing with the second piece and discovered that by putting it at an angle not only did it hide that the bottom layer was askew but it added visual interest to the whole bag that really played along with the whole zebra print/black satin/ hot pink motif. 

The inside has two pockets. One with a zipper and one patch pocket. ( a design change by me. 


I also made the strap a little longer and eliminated the hardware and attached it directly to the bag. 


Perfect length for my body. 

I have to admit... I love love love this bag and it is now my every day purse. I have never been so happy to drag a purse around with me before!

The ladybug bag gets used daily too; to haul around my lunch and walking shoes. 

And so, all the makes together...


Saturday, February 22, 2014

McCalls 6658

I've been excited about McCalls 6658 since I saw it.


So when I found this light knit fabric at fabric mart I figured it would be a perfect marriage.

It turns out I was right :D

Th pattern went together great, though it doesn't fit together exactly as you might expect.  Yes, I had to read the instructions several times to get it right, but it did come together eventually.  I love the cowl and the overal all drapi-ness of it.  As well as all the room.


It was all that 'room' that did me in.  I looked at the pattern and thought - oh, no need for a FBA - there's so much design ease in this...

What I didn't take into account is that a true FBA also adjusts for length - and somehow, through the photos and the line drawings (see if you can spot the problem)


I had missed just how short the front of this sweat is.

The seamstress is not amused

I mean really...


If I hemmed this it would hit me just at my beltline.  While on some tops that might be perfect but on a drapey capey sweat wrap thingy... :(

It needs more length.  That being said, I've spent two weekend mornings bumming around in this thing.  I love that it doesn't have real 'sleeves' so I can work with it on and still feel like I'm wrapped up in a blanket.

I don't think I need two of these, so I doubt I'll make another, but I'm glad I scratched the itch and finally made something from this pattern.

Marfy Blouse - a free pattern

Last month I joined in with the Marfy free pattern sew-a-long.

(you can download the free patterns here:  http://www.marfy.it/en-components-comjnews-includes-openflashchart-php-ofc-library-ofcuploadimage.php-nameulet.php/free-sewing-patterns/)

The sew along started with the blouse and you can follow along here:  (http://achallengingsew.typepad.com/my-blog/marfy-free-patterns-sew-along.html


I decided to make mine from a wine colored chiffon w/velvet polk-a-dots that I had found at Beverly Fabrics a few weeks earlier for about $3-4 a yard. I wanted something a little more solid for neck piece so I picked a slipper satin in a matching color.  I decided to use the satin to bind the arm holes and hem as well.

As suggested in the sew along, I made a quick muslin, but after cutting it realized that I had cut two backs!  I sewed it up and tried it on anyway, just to see length, etc and then figured, screw it, and went ahead and cut into my fashion fabric (being sure to cut one each front and back).

Overall the blouse came together quickly and I like the results.


Marfy - 1913

I did french seams on the sides and shoulders, and as I said I used my satin fabric to bind all the other edges.

I've fairly happy with how it turned out - though it looks much better by itself then with something over the top (I think).  so I will have to wait for the weather to warm up to wear it more.

That being said... this month I found another piece of chiffon - while at Walmart.  It was a remnent that had been marked to $2.00 and then was 20% off... seriously.  Better yet, it was a border print, and I had thought about making this top in a border print the first time.


This time I tried something different for the seams and finishes.  I grabbed my narrow hem foot and used that.  I'm sure someone before me had thought of using then hem foot to sew enclosed seams before, but I had never heard of it.  I worked like a dream.  With one pass I had a neat enclosed seam with no trimming.  And in no time I had another cute blouse to add to my collection.

Tuesday, February 11, 2014

Sewing Menswear

I was reading through a new blog (written by a man) yesterday and something he wrote got me thinking.

He mentioned how men's clothing is usually about precision, tailoring and making things look impeccable.   And, I realized, he's pretty much right, and maybe that's why I shy away so much from sewing men's stuff.

I have a confession.  I'm a lazy/sloppy sewer.

I don't normally finish seams, I'm always looking for a shortcut and if the fabric will let me get away with it... I don't even HEM stuff!

I sew because I like fun clothing that fits me.  And I like instant gratification.  I love making clothes from unusual and interesting fabric or from amazing and (often vintage) patterns.  Even better if it's both.  I want people to KNOW I'm wearing something that they couldn't find at the store and yet they are still surprised when I tell them I made it myself.

All of that is pretty much missing from men's clothing - and that's kind of sad.  And that's also why I have such a hard time sewing for my husband even though he's asked me more then a few times.

I know - this post isn't really going anywhere... except to say that I really do want to make my hubby stuff, and I really would like to find a way to make this a 'fun' activity for me so that I'm motivated to do so.  Maybe it means that I should TRY going for perfection now and then.  Spend the time and effort to make that couture piece of clothing where every stitch is impeccable...  Hmm  well if I do, I may just make sure it's men's wear so that I can let my husband enjoy my hobby too.

Monday, February 10, 2014

How to track a stash

I thought I would share my method of tracking my pattern and fabric stash.

I use evernote for both my pattern and my fabric stash.  it's free and super easy to use.  I have a notebook for my patterns and one for fabric.


Each time I buy a pattern - if it's from a website I use their webpage snapshot tool to capture a screenshot of the pattern.


I try to use "Simplified Article" if I can but I make sure that my clip grabs:  grabs the pattern's picture, recommended fabric, line drawing yardage etc.  It also capture the website URL for easy future reference.  I also save all my downloaded PDF patterns this way to make sure they don't get lost.

I then use the 'tag' feature to tag info about the pattern to make my data search able.  So I tag what the pattern is for (top, pants, skirt, dress, jacket, coat, etc) I tag what kind of fabric is recommended and other info.


So if I have a knit fabric that I want ideas for - I search through all my knit patterns with one click.  If I want knit dresses one more click and I have all the knit patterns for dresses.  You can tag on anything you like that way (such as a tag for costumes, or vintage patterns).


I do the same for my fabric.  either I do a screen shot if I bought it online (which captures a lot of great info) or take a picture when I get home, then write down width and length.  Then tag it with fabric type.  So when I get a pattern for a dress I want to make in cotton - I just open my notebook and in one click I can pull up every piece of cotton I have in my stash.


Best of all evernote syncs to any PC and to most phones so you have a copy of your stash everywhere you go!

Edit:

I wanted to also mention that I use this method to track all the patterns that come with my Burda Mag subscription.  Since each are eventually released on the website - when they do, I snapshot the page and save it to my pattern notebook, with all the same tagging as mentioned above.

Wednesday, February 5, 2014

February Garments are Underway!

I have a lot lined up that I want to do in February.  So many things I want to sew and so many awesome sew a longs right now.

But first...

I got my fabricmartfabrics order in of this lovely wool blend sweater knit.


(I'm sorry it was a great deal I couldn't pass it up)

And I got a nude colored lycra as part of one of their bundles (I love these things - it's like fabric Christmas http://www.fabricmartfabrics.com/Bundled-Assortments/)

So I'm making two items from McCall's 6658 - the sweater from the knit and a tank from the Lycra.  The tank I figure I can wear under thin items for modesty and for warmth.


I'm also planning on rolling through my pants fitting class on Craftsy http://www.craftsy.com/class/pant-fitting-techniques and making a wearable muslin from some ugly crepe suiting that I have and FINALLY learn to make/fit pants.

On top of that I'm going to do the Albion Sew-a-Long http://www.sewalongs.com/albion

and I want to make another fireside bowl bag for my daughter, and I'm making the next bag in that sew along (called the go-go bag) using scraps from the zebra print coat that I didn't get to finish last month :D

PLUS...  the Marfy sew-a-long continues with the Marfy skirt. And there's a vintage pattern sew-a-long that I want to participate in so that I can use some of my vintage patterns at LAST.

So, what I have gotten done so far.

My go-go bag is cut out, but I need to buy some interfacing - then that will be ready to sew.

I've got my fabric cut for the tank and the pattern pieces rough cut for the sweater of the Mccall's pattern.

I have printed and taped the Marfy pattern and the Albion pattern.

I've watched the craftsy course all the way through so I know what I'm getting into there...

And all my fabrics are pre-treated (washed etc) so I can cut into those right away.

Lastly I just HAVE to to share this amazing fabric that arrived today.  I can't pass up a bargain so when I saw this on clearance...


Yes, it's a red liquid lame... I had to buy it.  I see a Jessica Rabbit dress in my future.  Just not this month :D

(P.S. the Zebra coat is on hold - I need to buy more fabric for it - I cut the front pieces wrong and I don't have enough fabric to recut)

Monday, February 3, 2014

Big City Bags - Fireside Bowl

Well,  it's done!  I did it.

Made my first Bag and finished it before the end of January.

My inspiration for the bag was the ladybug fabric that I used for my birthday dress.  That plus some red for contrast and I was set.


Fireside bowl bag

I had thought to use black for trim, but I didn't have any black on hand and I've been working on sewing through my stash so I used the white intead.  I'm still happy with the results.

You probably noticed that I reversed the fabric at the zipper between the outside and the lining - that was deliberate.  I love the little peek of purple and ladybugs on the inside.  I just wish I had thought to use the ladybug fabric for the pockets too.

I used a metal zipper and wanted the teeth to show so I inserted it a little differently so they would.


Reside bowl bag

And, just to give you an idea of just how roomy this bag really is (I was surprise at the size)


Reside bowl bag

I don't know if it was the fabric type or my interfacing that caused the bubbling on the purple fabric, but it's the only thing I don't like about this bag.  For my next one I'll test the interfacing/fabric bonds before just slapping iron to cloth.

Overall though, I extremely happy and can't wait to start on another bag this month!